Featured Contents

iPhone Cake

I suppose I should start this first with some of my latest cake designs. I'm still an amateur of course, but a very quick learner! I initially learned cake decorating when I was about 8 years old as I used to watch my mom (who by the way, is also an avid baker). Ever since then, I'd find myself sneaking into the kitchen, baking a [...]

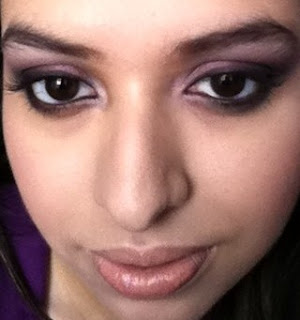
Smoky Dramatic Purple

I have another makeup look to share with you :) I got creative and felt a bit purply so thought I'd come up with something new, and so here it is![...]

My Favorite Mascara!

I'm going to do a review of my most favorite mascara, along with 2 alternatives that are quite comparable both quality-wise and price-wise. I hope this will make it easier for those looking into finding the perfect do-it-all mascara without having to experiment with a few to find it. [...]

Neutral Day Makeup

So I thought I'd post a photo tutorial of what I use to achieve my go-to day makeup. It's fairly easy and natural looking without using any heavy face products. [...]

Latest Posts

0

Dramatic Smoky Purple!

Elle 3.03.2011
Hey there everyone,

I have another makeup look to share with you :) I got creative and felt a bit purply so thought I'd come up with something new, and so here it is!

Face:
MUFE Mat Velvet +
MAC Mineralize Skinfinish Natural
MAC Peachykeen Blush
NARS Laguna Bronzer
NARS Albatross Highlight

Eyes:
Artifact Paintpot
Nocturnelle e/s
Signed Sealed e/s
Carbon e/s
Shale e/s
Soft Brown e/s
Seedy Pearl e/s
Vex e/s
Blacktrack Fluidline
Diorshow Mascara

Lips:
MAC Creme de Nude lipstick
MAC Viva Glam V Lipgloss

For eye eyes, I first applied MAC paintpot in Artifact all over the lids, and then packed on Nocturnelle with a 252 brush. I then used a 279 (wedge shaped brush) in the outer edge and applied Signed Sealed just about 1/3 of the way in. Then I used Carbon to intensify the outer corners of my eyes with a 239 brush. For my crease colour, I used both Shale as well as Soft Brown to warm up the colour a bit. Finally, I used Seedy Pearl as a highlight shade and Vex for the inner corners. I lined my eyes with Blacktrack fluidline, swept on some mascara and voila!

The look turned out much better than I originally anticipated. I was in the mood to do a very dramatic and smoky look and turned to my purple palette which I hadn't touched in eons, and this was the final product! I'm quite proud of it as it did take a little while with all the blending involved. Usually my ever day routine is extremely quick and I usually don't even use foundation! I just sweep on some Mineralize Skinfinish Natural with some blush - usually NARS Orgasm (It's my absolute fav :P), some eyeliner and I'm out the door on a regular day! I usually leave the dramatic stuff for the evening, so this is definitely uncommon.

Anyway, I hope you like it and will learn a thing or two in some way or another :) Ciao!
0

Neutral Day Makeup

Elle 2.19.2011
Hey Everyone!

So I thought I'd post a photo tutorial of what I use to achieve my go-to day makeup. It's fairly easy and natural looking without using any heavy face products. I thought I'd do something a little different from the regular warmer brown tones in the crease by using fairly cool-toned. All products are MAC unless otherwise stated.

Eyes:
MAC Painterly Paint Pot
MAC Femme Fi
MAC Patina
MAC Espresso
MAC Mylar
MAC Soft Brown
MAC Blacktrack Fluidline
Christian Dior Diorshow Mascara

Face:
MAC Mineralized Skin Finish Natural
MAC Peachykeen Blush
Nars Laguna Bronzer

Lips:
MAC Call My Bluff Lipstick
MAC Viva Glam V Lipglass

So here's how I did it:
First I used Painterly Paint Pot as a base on my eyelids, then packed on Femme Fi all over with a 252 flat brush. Then I lightly blended Patina into my crease with a 222 blending brush until it created a very soft crease line. Finally, using a 239 flat brush, I used Espresso in the outer V area for a bit of definition. Of course if you're looking to create an evening look, you can always pop in a bit of black eyeshadow in the corners for even more definition! Then I used Soft Brown very lightly in the crease to create a more natural blending effect, and lastly, highlighted with Mylar under my brow bone. I lined with fluidline and topped it off with my Diorshow Mascara and voila!

As for the face and lips, it's pretty self-explanatory. After applying moisturizer on my face, I swept MAC Skinfinish Natural all over, and then applied Peachykeen blush on the apples of my cheeks with a 187 Duo Fibre brush. I thought I'd add a bit of color to my skin so I used Nars Laguna bronzer for a natural glow. And lips, I just used Call My Bluff lipstick and then used a coat of Viva Glam V lipglass on top.

This is usually the look I go to when I don't want to use typical warm browns on the outer edges! Hope you liked it! :)
0

Scrumptious Spicy Chicken Kabobs!

Elle 2.11.2011 ,
Hey Everyone!

So I have been experimenting lately in my kitchen and I seem to have discovered a winning recipe of Chicken Kabobs! It's predominantly an Indian cuisine that has marinated chicken cubes on a skewer. Of course, there are many variations to this and you can even alternate with pieces of veggies or potatoes - whatever your like! Also, there are a ton of ways they can be cooked - in the oven (like I did), on a BBQ grill or even in a fry pan. I baked mine, which is why they are virtually fat free! The picture is not of the ones I made though, it's taken from Google. They were gone before I could even snap a picture! Here's how I made them:

2 tbsp  fresh lemon juice
2 tbsp  vinegar
1 tbsp  tandoori chicken mix (available at almost any Indian grocery store)
1 tsp  coriander powder
1 tsp  fennel seed powder
1-2 tbsp  mustard
1 lb  boneless chicken breast or thigh (cut into small cubes)
2 tbsp  oil (only if you're grilling or frying in a pan)

1) Mix the lemon juice, vinegar, tandoori chicken mix, coriander + fennel seed powders and mustard until well combined.
2) Throw in the cubed chicken and let it marinate for about 30 minutes.
3) Skewer the pieces onto wooden sticks (or even metal ones if you have them). At this point, you can add other pieces of vegetables if you like to the skewers.
4) To cook:
Bake at 400 degrees Fahrenheit for about 20 to 30 minutes. To do this, line a 3x9x2 inch baking pan with aluminum foil to avoid ruining your pan. Put the skewers on top in such a way that the ends of the sticks are balancing on the edges and the meat is hanging for it to cook evenly. (I'll take a picture of this next time to show you guys.)
or:
Fry with oil in a large flat pan on medium heat until the meat is cooked, or:
Grill the kabobs (if you choose to do so, make sure you add oil into the marinade).

And there you have it, spicy scrumptious Chicken Kabobs! :)
0

My Favorite Mascara!

Elle 2.07.2011
Hi Everyone!

I'm going to do a review of my most favorite mascara, along with 2 alternatives that are quite comparable both quality-wise and price-wise. I hope this will make it easier for those looking into finding the perfect do-it-all mascara without having to experiment with a few to find it.

So, the first one on my list is the original Diorshow mascara by Christian Dior which retails at about $25. I originally received mine as a gift and was reluctant to use it seeing as I was already content with my previous favorite (MAC Plush Lash). However, I thought I may as well give it a shot, which ended up in the total abandonment of every other mascara I own. Here's why: it has a nice big brush that applies mascara evenly to all my lashes without a single clump or the dreaded 'webbed' effect I find a lot of other mascaras create. Also, it makes my lashes look super thick, long and voluminous with only one application WITHOUT ever flaking! You can see a sample of what it does in the picture I posted here: Classic Neutral Evening Look. Lastly, I want to emphasize the fact that this mascara is WEIGHTLESS! No heavy feeling on the lids, no feeling of my eyes being dragged down by a heavy formula - most of the time I can't even tell I have any on!

Now, the bad: it comes with a rather expensive price tag, especially for mascara that should essentially be discarded after a few months of use for hygienic reasons. I feel I can buy a cheaper alternative that does almost the same thing (only with a little more fuss). Personally though, I still think $25 is totally worth it for this, especially if you're looking to buy for a special occasion, or even for everyday purposes. Secondly the other (very minor) problem I have with this particular one is that it is NOT waterproof, therefore it won't work at emotional events like weddings and stuff. (Although, I'll speak about an alternative to that in a minute).

My runner up is.. you guessed it: MAC Plush Lash. Amazing formula and amazing length. It's actually what my makeup artist used on me for my wedding day - although it's still a wonder to me as to why it didn't run even though it's not waterproof! Either way, This was my favorite before the Diorshow showed up in my life as this creates a smooth and clump-free application while adding tons of volume and depth. Additionally, I'm drawn to the brush applicator as it's big and plump, obviously doing good things to my lashes. It retails for about $17 (in Canada - a little less in the U.S. though), and lives up to it's expectations quite well. If you're looking to buy a MAC mascara, this would definitely be the way to go.
The bad: it tends to create a slight webbed effect if I apply just a tiny bit more than needed in the first go, which leaves me to completely wash it all off and reapply again - a complete hassle! Also, it creates a sort of weighted feeling when you first apply it, although that goes away after a while as your eyes get used to it. It does cause some flaking - which can get annoying sometimes as you have to keep pulling out your compact to check up. And lastly, it's not waterproof so it's bound to run at some point.

Thirdly, I'd like to introduce the Lancome Cils Booster XL (Super-Enhancing Mascara base) along with it's partner in crime, the Lancome Deficils (High Definition Mascara). Together, these two create lashes with decent volume but extraordinary length. I love that the base slightly lengthens each lash individually, and then the black on top just magnifies it all into perspective. It does however, flake a little bit and creates the webbed effect when you don't allow the base coat to dry completely before applying the black coat. The brushes on these are quite standard as they are straight-shaped with no doming or anything like that - this does make it a bit difficult to use because a lot of buildup occurs at the tip that needs to be wiped off prior to use - otherwise it'll create clumping on the lashes.What I like about it however is that you get a good amount of volume with this combination without lashes sticking together like a wing (not sure if that makes sense!). The downfall here is that you need to buy both to have the desired effect because I find the Deficils doesn't do much on its own. Also, it's not waterproof and creates that weighted effect on the lids (though it wares off).
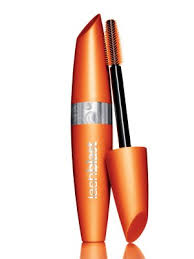
My last alternative is a drugstore brand, so it's definitely much cheaper than the previous ones. Retailing under $10, the Cover Girl Lash Blast seems to do much of the same job that the Dior, Lancome and MAC mascaras do, only at a MUCH cheaper price (although I did find some cons to this which I'll explain in a bit). With the Lash Blast, my lashes look full, voluminous and long. I find I can build up the intensity I want (similar to the Diorshow) without it creating a webbed effect however, only to an extent. Anything past 2 coats creates an unnatural webbed look I find similar to that created by Plush Lash when applied excessively. The applicator is much different from the previous two as it has short, plastic bristles which definitely serves for a different type of effect, and also allows for no clumping. It does however, tend to flake easily (especially with multiple coats), so again, it can get annoying having to check up on it every few minutes. Also, this baby is waterproof so that's definitely a plus, however that may not necessarily be a positive thing because it's super difficult to remove by the end of the night! All in all, definitely comparable to the Diorshow, lasts much longer and creates similar effects- with a few minor setbacks of course.

So ladies, the choice is yours. I have tried tons more, but only these 4 stand out to me the most in terms of great quality and perfect lashes. Hope this helps!
0

Classic Neutral Evening Look

Elle 2.06.2011
Hey Everyone!

I thought I'd make my first Makeup post about my classic go-to evening look. I sometimes wear this look during the day as well at a less dramatic scale. Since this is a picture taken earlier, I don't have a step-by-step photo tutorial but that's something I'll definitely work on soon :) I used mostly MAC products (probably my most preferred brand) and a few others. Here is a complete list:

Eyes:
Urban Decay Primer Potion
MAC Painterly Paint Pot
MAC Grain
MAC Romp
MAC Bronze
MAC Mylar
MAC Soft Brown
MAC Mystery
MAC Black Track Fluidline
Dior Diorshow Mascara

So to begin, prime your eyes with Urban Decay Primer Potion (or any other eye primer for that matter), and then lightly apply Painterly all over the lid. With a flat shader brush (I used the MAC 252), pack Grain onto the lid. Then with a blending brush (such as MAC 222), take a bit of Romp and blend into the outer eye, then with whatever is left, work it into the crease going three quarters in - this will create a sort of gradient for your next step. With the same brush, take Bronze and blend into the outer corner, and drag some onto the lower lash line. If you want a more dramatic look (like I have here), take a small shader brush (like the MAC 239) and create a very small wedge shape in the outer corner with Mystery. Finally, use Soft Brown with a blending brush (like a MAC 222 again) and lightly blend it into the crease to create a more shadowy effect. Lastly, highlight your brow bone with Mylar, and also add a little to the inner corner of your eyes to brighten them. Finish with eyeliner and mascara and your look is complete!
0

iPhone Cake

I suppose I should start this first with some of my latest cake designs. I'm still an amateur of course, but a very quick learner! I initially learned cake decorating when I was about 8 years old as I used to watch my mom (who by the way, is also an avid baker). Ever since then, I'd find myself sneaking into the kitchen, baking a cake when no one was home, and then pulling out my mom's decorating set with her shiny tips and letting my imagination wander. I taught myself how to do borders, flowers, writing, and all that other fancy stuff mostly by looking at decorating magazines and YouTube videos (after I turned 13 and the internet became more popular-that is!). But either way, my most prized creation is my most recent cake that was shaped as an iPhone for my husband's birthday, primarily because it was my first time working with fondant!


So what do you think? I know I've messed up on small little details here and there - but hey, it's only my first time working with it! I hope to definitely make more cakes with this. The only issue I seem to have is that the fondant itself is way too sweet, so most people tend to stay away from it. Just an FYI for those who aren't familiar with that term: "fondant" is a type of icing that's like dough and you roll it out into a sheet and cover the cake to give it that flawless look. You'll see in some of my later posts the difference between fondant and regular icing (as I usually tend to use regular buttercream icing in most of my cakes just because it tastes better and is lighter).

Anyway, that's my first baking post!
Until next time,
Peace :)
0

My First Post!

Elle 2.05.2011
Hey Everyone,

Welcome to my blog! I should probably introduce myself - I'm known as Elle (although that is not my real name of course!). I love everything girly, and therefore had the most difficult time trying to name my blog because I plan on talking about almost everything and anything from makeup, beauty tips, recipes, health, fashion and almost anything else girl-related. I am an avid baker as I absolutely LOVE cakes and baking, while at the same time I have a passion for makeup and fashion - just like any other girl! So welcome - hopefully this will grow into something much more one day.

Until then,
Peace.
 
Copyright 2010 Sugar Sweet Beauty